Liese creamy bubble color is the latest bubble technology from Japan brought to you by Vibelle Distribution inc., comes in 6 brown tones available here in the Philippines- Chestnut brown, Milk tea brown, Marshmallow brown, Milky Beige, Raspberry brown & Rose tea brown.
Well I’ve attempted to try the “Chestnut brown”, because I wanted that classy dark chocolate brown color and my roots are already showing means I need to retouch, even it out and it is the nearest shade from my previous hair tone (it was actually reddish-brown before).
What caught my attention to try the product, because the advertisements says it is easy to apply and it is worth P499.00 – not bad. Liese, is locally available at Landmark, SM department stores and Robinsons, I think. I got mine from Landmark, and it was almost sold-out. I waited for 2 weeks for the re-stock for Chestnut brown to be available.
So lets start with the box, it says “EASY & COMPLETE COVERAGE”. Well it is easy because you could do it at your very home, simple instructions to follow though quite messy in a way so it would be nice to ask for help and plan ahead . It does work fast in just about 20-30 minutes. It did give a full coverage on the OUTER layers of the hair, but in between the roots some parts didn’t especially the hard to reach parts or I didn’t part it properly?
My friend and I realized that we should have SECTIONED our hair and asked someone to apply foam on the hard to reach areas and the inner roots- like the traditional way we apply hair color. Overall it is a good product and let’s be honest there is a difference between DIY coloring done at home and done professionally in a salon but not all can afford and I do recommend it.
TIP: If you have short hair (SHOULDER LENGTH), 1 box is enough. If your hair is long & thick opt for 2 boxes ( like what I did).
STEPS:
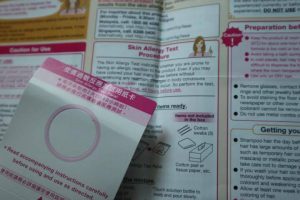
- Read the instructions outside the box and it comes with a handy manual inside. PLEASE READ THE “CAUTION FOR USE” PART on the MANUAL (Read everything actually)
And SORRY, I disregarded the skin allergy test- so it was my own judgement HUHU. I have sensitive skin that’s why but I checked the ingredients I don’t have any allergies with any.
I’ll be honest, apparently some foam touched my ears while applying (my fault) which I ignored and didn’t take notice. So the next day, the back of my ears became itchy & red. I managed it by applying ALOE VERA SOOTHING GEL every time since it is all natural/organic, it has anti-inflammatory properties and took 1 dose of Claritin incase it was allergies and to lessen the itchy feeling, the next day I was better. I guess it was a NORMAL side effect. Maybe that’s why there was a need for OIL BASED SKIN CREAM (Read #2). #PASAWAY or I should had rinsed it off the first place.
But before that, make sure you have no allergies. As mentioned in the guide manual there are SKIN ALLERGY TEST PROCEDURES (done 48 hours in advance) and there is an available skin allergy test panel. As a nurse, also check the contents of the product.
- Set up your hair & materials
Items inside the box include: Shampoo hair day before (preferably), Make sure your hair has no tangles and combed properly. No other products used on your hair.
- Solution 1
- Solution 2
- Foamer Cap
- Gloves
- Rinse off treatment
Instruction sheetThings for you to set up/prepare
Large Towel / cape that won’t mind staining. FOR ME, I used an old black colored shirt that I don’t use that much.
Small towel – for wiping any excess foam and others.
Floor covering such as news paper – well some of the foam hit my room & washroom ‘s floor(s) plus the bathroom sink, it didn’t stain for as long you wipe and clean it right away. Unfortunately on my furniture there was a spot and it truned white. It says in the manual, foam splatter may cause staining HUHU
Mirror
Clock
Oil based skin cream ??? – to wipe off the excess, I think (Didn’t have one prepared but it was mentioned on the manual with no rationale ). Then I realized maybe I should applied it on the back of my ears incase of contact with the foam IDK?
Cotton pad and tissue paper – to wipe off excess,
- Foam application
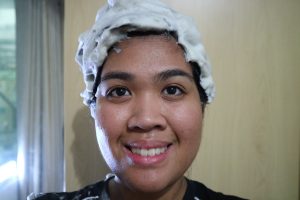
- For the solutions, room temperature is just fine. So FIRST, get solution 1 which is the small bottle that says number 1 and all in Korean writings.Pour solution 1 into solution 2, then close the lid of solution 2.Solution 2 – GENTLY INVERT THE CONTAINER BACK AND FORTH at 180 degree angle for 5 times (CHECK THE MANUAL ON THE PROPER PLACING OF YOUR HANDS- to know the form)- make sure it doesn’t foam inside, DO NOT SHAKE.Place the FOAMER CAP properly, twist until it is tightly sealed. Once done COLOR HAIR IMMEDIATELY! Mixture will lose its effects 60 minutes after being mixed.Put on gloves, HOLD CONTAINER IN AN UPRIGHT POSITION and squeeze the center part to dispense foam on your hand/palm.Now it is time to apply the foam YAY! Do not apply foam directly from the bottle to hair – Avoid foam in contact with the eyes.TIP: For short hair, apply ¾ and for shoulder length use the ENTIRE BOTTLE -Since I have thick and long hair, 2 bottles. For me, I prepared the 2 mixtures first and applied it all on my hair for as long I meet the 60-minute time range for the effectiveness of the dye. (As mentioned earlier).APPLY FOAM AT THE ENTIRE HEAD/SCALP and PARTING WITH GENEROUS AMOUNT OF FOAM.THEN BACK OF YOUR HEAD & AFTERWARDS, APPLY TO THE HAIRLINE AND TO THE ENDS OF THE HAIR.TIP: Then start SECTIONING for the hard to reach parts and roots. The trick is to make sure you cover your hair with bubble foam from roots to tips. AFTER THAT GATHER YOUR HAIR UP.USING YOUR FINGERTIPS (still on GLOVES), GENTLY MASSAGE UNTIL HAIR IS COVERED WITH FOAMY LATHER – Do not massage vigorously.
NOTE: After use, make sure you use everything in the bottle, it may cause the bottle to burst. For the remaining, wash it down the drain.
- Waiting Game Yay! (20-30 MINUTES)
NOTE: Lather may disappear and may start dripping
- RINSING
- Rinse with lukewarm water, shampoo your hair thoroughly once then REPEAT.Apply the RINSE OFF TREATMENT, RINSE and DRY HAIR COMPLETELY.TIP: Incase of skin staining, use makeup remover or soap & water then rinse it off
Well I was happy with the result and I achieved the shade I wanted plus it didn’t dry or damage my hair. It has been almost a month since I colored my hair with LIESE, just have proper hair treatments to maintain your colored hair- using shampoo for colored hair and conditioner. You’ll get to appreciate it more as the days go by.
The back of my ear just reacted the day after, but all was well after managing it. I was just sharing my experience incase you guys may have a similar encounter and to prevent. #TIISGANDA
Note: Results/ Shades may vary according to your hair tone
It’s your judgment if you want to wash your hair the next day or not (traditionally they say for the color to stick/last but it wasn’t mentioned on the manual). For me, I skipped a day not to wash my hair.
BLOG GIVEAWAY!
Here is your chance to win Liese Creamy Bubble Hair Color in Milk Tea Brown 💁🏽 1. Make sure you follow me @krishgeekness and @liesephilippines on instagram
2. Like this photo and regram the photo with the Hashtag #KrishgeekLieseCreamyBubbleColorGiveaway 3. On the caption, mention what are your goals to achieve with using Liese Creamy Bubble Color – best answer for me wins! And tag 4 lovely friends 👯👯 Can’t wait to read your entries. I dont mind the number of entries and likes. Applicable to Metro Manila, PH Residents ONLY! Contest runs till October 29, 2016. My review on Liese Creamy Bubble Color on the blog in a bit! www.krishgeek.com


